It’s hard to find a software company, besides embedded, that doesn’t take advantage of using Docker as their container solution. Even harder when it’s a company that focuses on the Web. There is a good reason why this is the case, it’s making life a lot easier for SWE/SRE/DevOps Engineers.
Earlier problems that could be faced were things like “it works on my machine”. Simply put that when deploying on production or on another developer's machine it could behave differently than expected and thus experience problems. Now we can easily say when using Docker “it works on every machine, in the same way”. That’s really good we can now have a certainty of the deliverable that we didn’t have before so we can deliver a good product, especially in production.
From the Wikipedia:
Docker is a set of platform as a service (PaaS) products that use OS-level virtualization to deliver software in packages called containers. The service has both free and premium tiers. The software that hosts the containers is called Docker Engine. It was first started in 2013 and is developed by Docker, Inc.
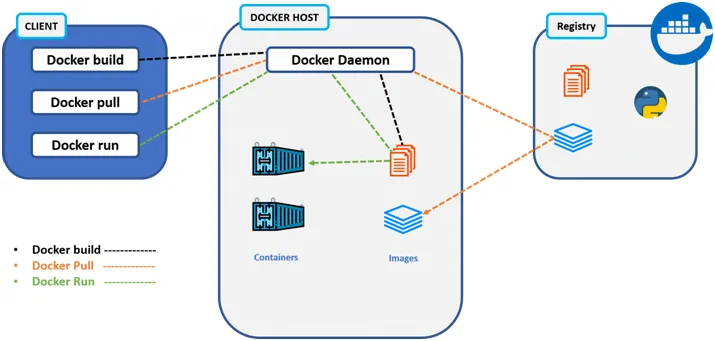
This is the Docker Architecture and how it works:
In this tutorial, you will need to understand how Spring Boot works and Gradle in order to understand some build processes.
Pull a Docker image and run a container
So from the client (your OS), you are running commands to the Docker Deamon that runs on your computer. You could either set up containers from images, create images, create volumes, create networks and much more. When we run a command such as:
docker run -e POSTGRES_PASSWORD=password -d postgres
What this does is try to run a container with an image called postgres. We add an environment variable POSTGRES_PASSWORD with its value so PostgreSQL will use that for the postgres default user. Docker then tries to find it locally, if not it will try to pull the image from the configured registry, default Docker Hub. Then it’s trying to start it and we get back a full hash value of the container ID it has been assigned.
So when we run docker ps we get the following information here about it:
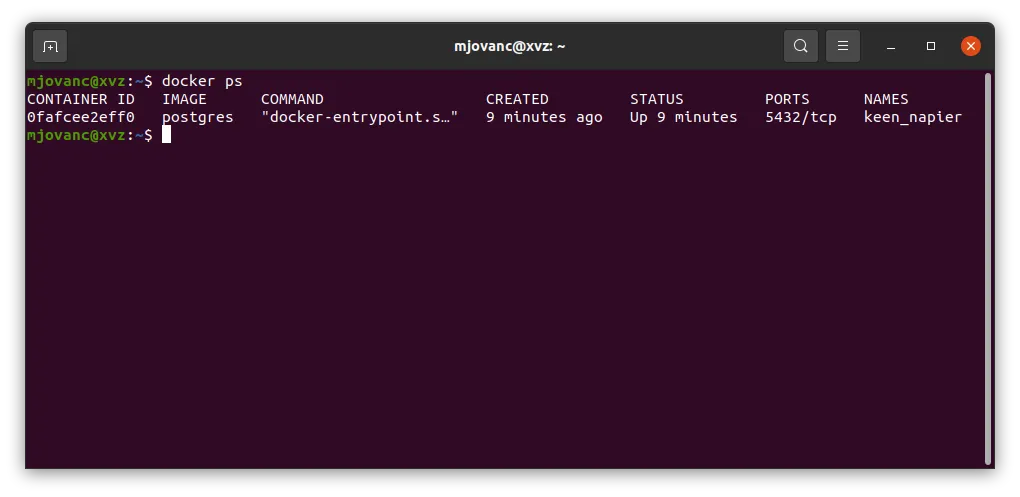
So here we get the unique container ID, image that we are using, the command that is passed to the container, when the container was created, the current status if it’s up or exited, what port it is listening on and the protocol and the assigned name.
We can change the name if we want, this is how we do it with Docker, we just need to change our previous command slightly:
docker run --name mydb -e POSTGRES_PASSWORD=password -d postgres
But before running that command again we need to remove the existing container since it will be listening on the same port twice. We first have to stop all the running containers.
We then do a clean-up in two different ways (perhaps even more that I’m not aware of). We can do a total clean up like this:
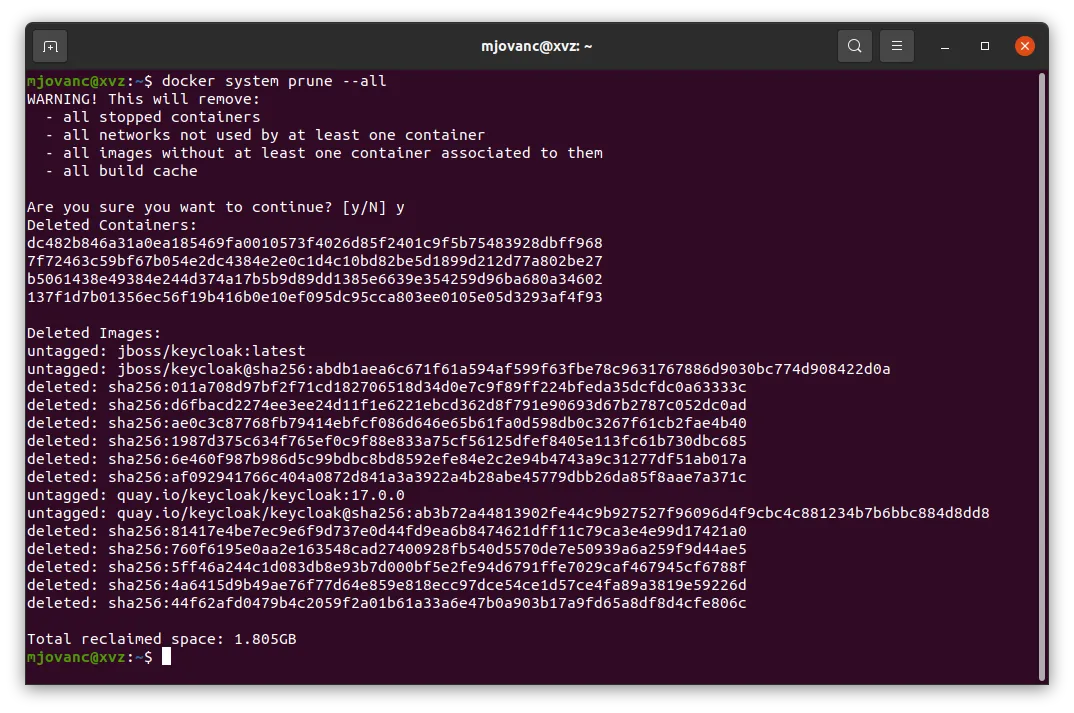
You have to be aware that this removes everything. So it’s not a good way to use this most of the times. But if you feel like you have been doing a lot of things and just want to start from the beginning, this is a good one.
There is another more better alternative in most of the cases. We run these commands:
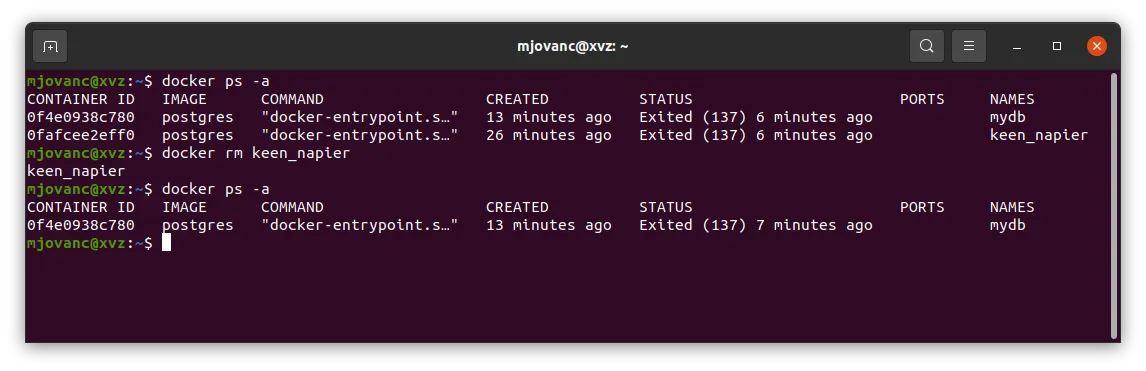
So we just use the command docker rm along with its container name or you can also use the container ID with that command. So you can see that we removed keen_napier here and we only have our new container. Since we stopped all containers we have to start our new one and we can do that by:
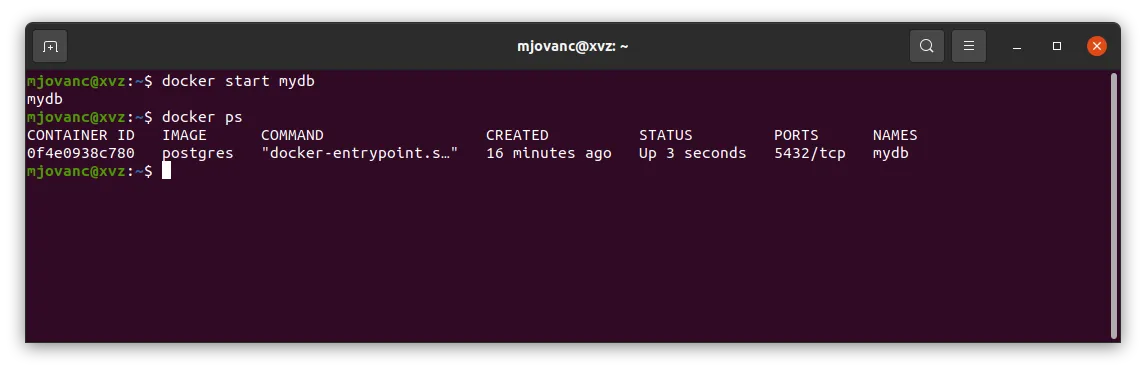
So it’s quite easy to just start it again here with the docker start command.
Now we have a Docker container up and running. There are a lot of things with Docker we could go through here, but we will stick to the basics sort of. When we ran that command to set up PostgreSQL in a Docker container it automatically added a volume for us.
Volumes are essential when we need to write something, and that is critical when it comes to databases. Docker won’t allow writing in a container so we always need to attach a volume to it. We will go through that soon how to create our own Docker image, but let’s explore how we can view the docker volumes on our computer:
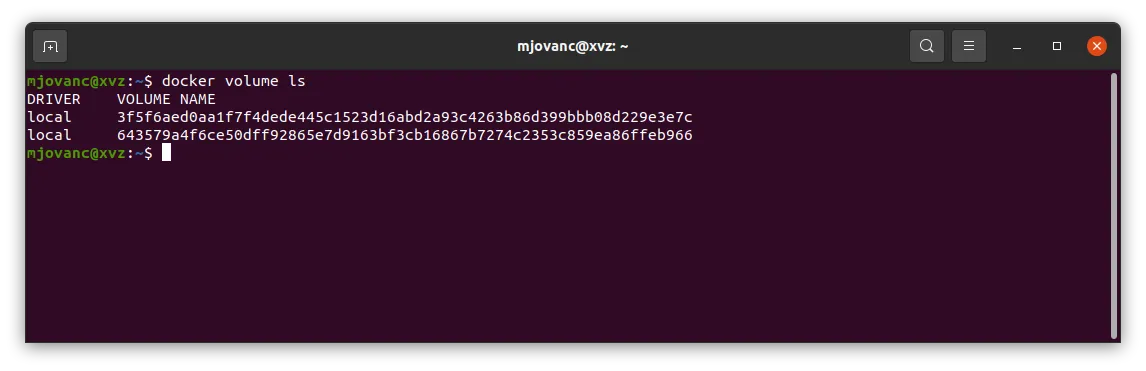
With docker volume ls we are listing all the volumes we have currently. We have two since we didn’t remove the last one. So how do we know which one is attached to the one that is running currently? We can do this by inspecting our current Docker container:
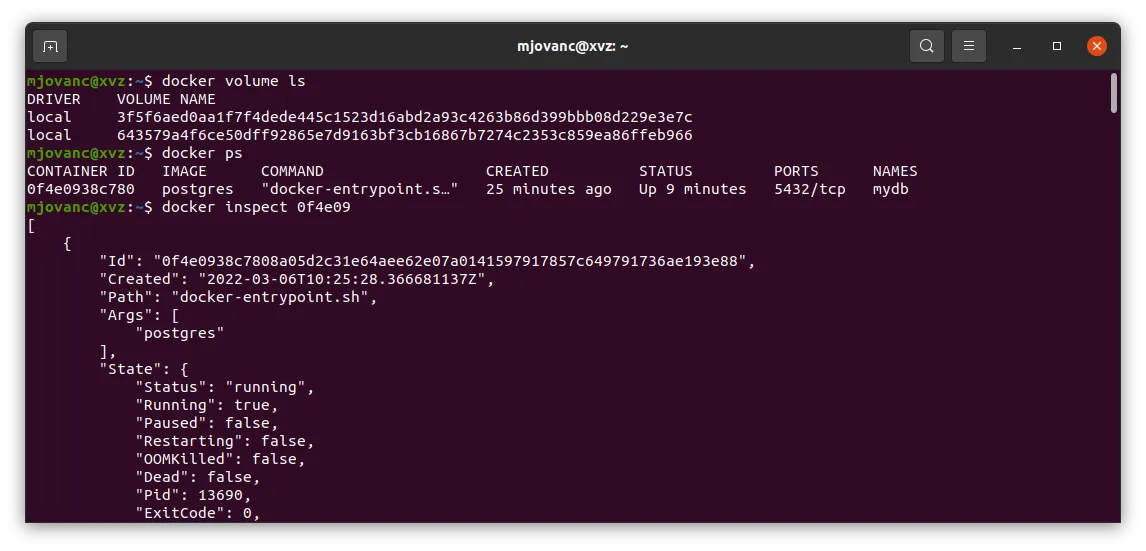
Here we see a lot of information about it, this is very useful for troubleshooting.
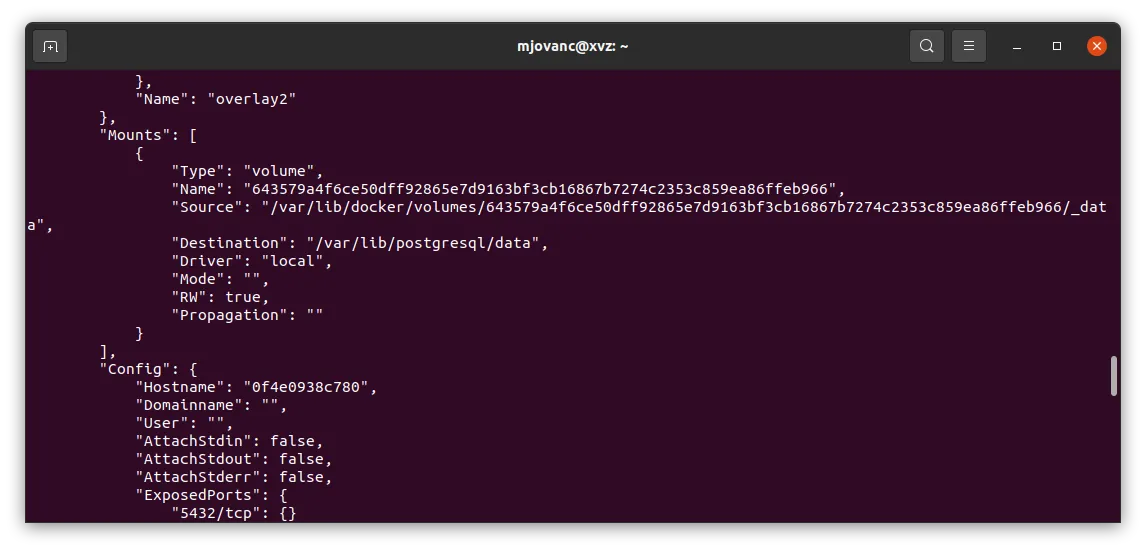
We scroll down a bit and we can find the Mounts array and we see the volume hash value and we compare that to the one we saw in the previous image 643579a4f6ce50dff92865e7d9163bf3cb16867b7274c2353c859ea86ffeb96. So this is the volume that we need to keep so let's remove the other one since we don’t need it anymore:
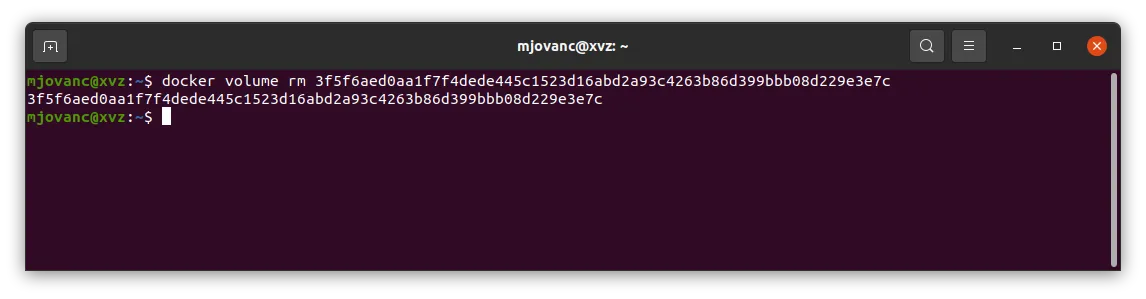
We get a confirmation here with the hash value back that it has been removed. Great!
Create a Docker image using a Dockerfile
Now lets look at how to create our own custom Docker image by creating a Dockerfile. As we have been going through Spring Boot before we can try make our Spring Boot application to a Docker image. Clone down the repository: https://github.com/mjovanc/medium-docker-spring (does not exist anymore unfortunately...).
Now let’s download all the dependencies and build the application, I suggest using IntelliJ for this. Open up the project and then IntelliJ will automatically download everything directly by looking at build.gradle file. Then we need to build it by either running ./gradlew build or pressing the Gradle on the right sidebar in IntelliJ and press double click on build:

So when we have done this we will get a .war file inside ./build/libs/blog-0.0.1.war. This is needed so we can pick up this file with our Dockerfile and add it to the image. So lets create the Dockerfile in the root of the project:
# Using Tomcat 9.0 since the latest doesn't work with Spring Boot
FROM tomcat:9.0-jdk16-openjdk
ARG WAR_FILE=build/libs/blog-*.war
RUN rm -rf /usr/local/tomcat/webapps/*
COPY ${WAR_FILE} /usr/local/tomcat/webapps/ROOT.war
EXPOSE 8080
CMD ["catalina.sh", "run"]
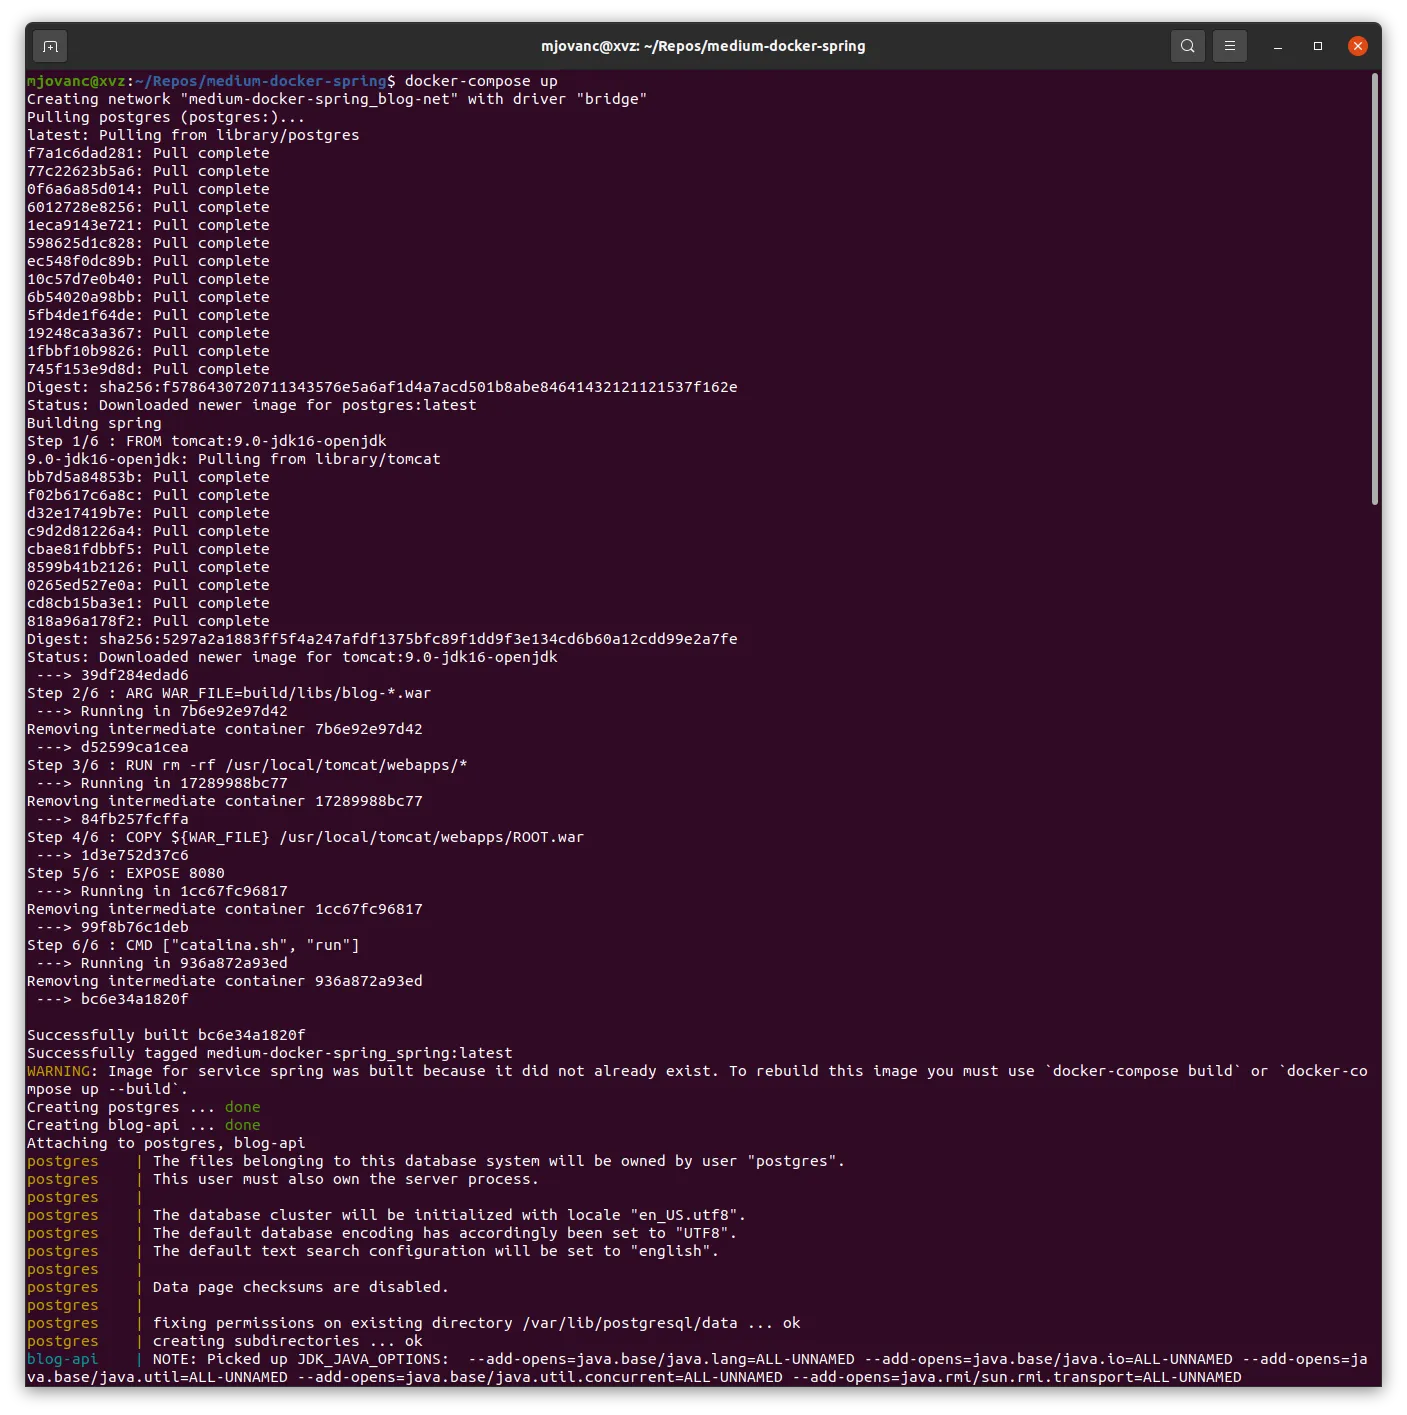
This is the necessary code for the Dockerfile. We are first using an existing image tomcat:9.0-jdk16-openjdk and then we modify it as we want. We set an argument where the .war file exists, then we remove all .war files inside /usr/local/tomcat/webapps that exists, then we copy that .war file we have created and we place it in that same directory where we deleted all the .war files so Tomcat can use that one.
We then expose the container to port 8080 so it can be accessed outside the Docker container on our host OS and then run the shell script catalina.sh with the argument run.
Now that the code is in place we need to build the image:
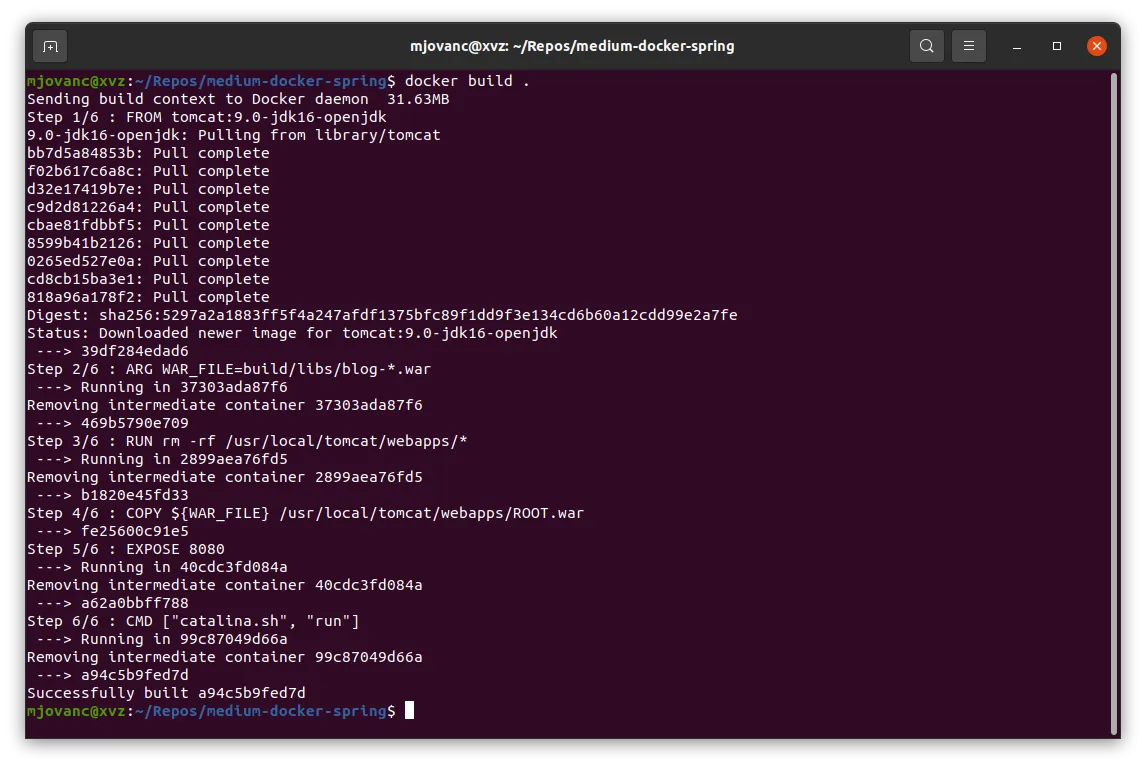
We could also build the image and tag it so we get a name and a version to it by running this command:
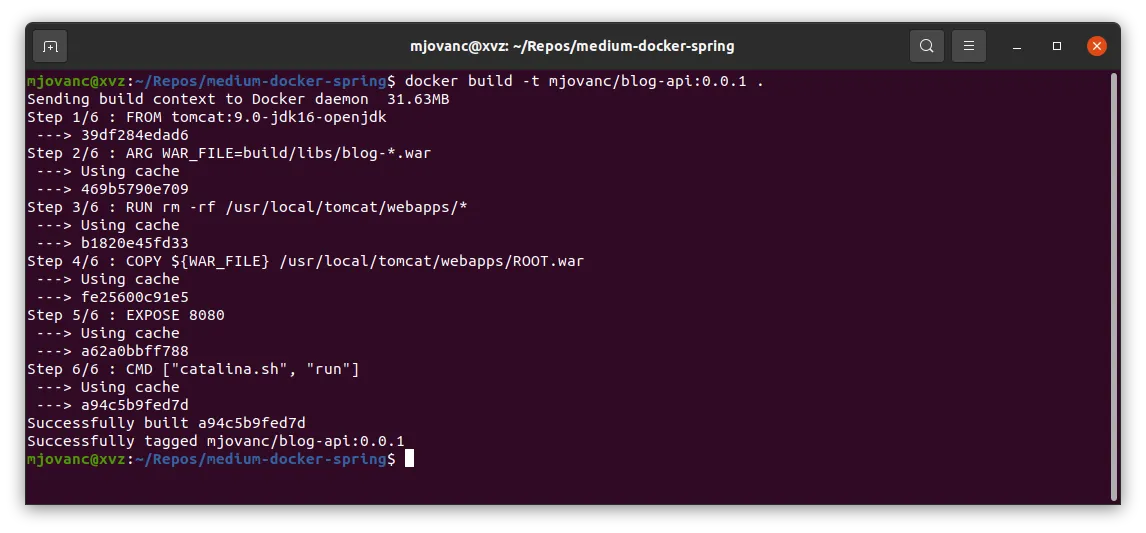
We have successfully built our first Docker image. Now we just need to start it. And since we already set fallback values for our environment variables in application.yml we don’t need to pass them while starting up the container locally:
docker run --name blog-api mjovanc/blog-api:0.0.1
Now the container is up and running! This is a very basic example how to create and run a Docker container.
Using Docker Compose to orchestrate
Now we will look into how we could use Docker Compose to setup both the PostgreSQL and Spring Boot.
Compose is a tool for defining and running multi-container Docker applications. With Compose, you use a YAML file to configure your application’s services. Then, with a single command, you create and start all the services from your configuration.
Read more about Docker Compose here: https://docs.docker.com/compose/
It will make it a little bit easier since we can configure everything in YAML file format. Lets look at this Docker Compose file:
version: '3.7'

services:
  spring:
    build: .
    container_name: blog-api
    environment:
      POSTGRESQL_HOSTNAME: postgres
      POSTGRESQL_PORT: 5432
      POSTGRESQL_DB_NAME: qryptic_dev
      POSTGRESQL_DB_USER: postgres
      POSTGRESQL_DB_PASSWORD: test1234
      KEYCLOAK_HOSTNAME: keycloak
      KEYCLOAK_PORT: 11111
      # This below is optional if you need to specify a specific Spring Boot profile to use
      # JAVA_OPTS: '-Dspring.profiles.active=dev'
    ports:
      - "8080:8080"
    links:
      - postgres
      - keycloak
    depends_on:
      - postgres
    networks:
      - blog-net

  postgres:
    image: postgres
    container_name: postgres
    restart: always
    environment:
      POSTGRES_DB: qryptic_dev
      POSTGRES_USER: postgres
      POSTGRES_PASSWORD: test1234
    volumes:
      - postgres:/data/postgres
    ports:
      - "5432:5432"
    networks:
      - blog-net

  keycloak:
    image: jboss/keycloak
    container_name: keycloak
    restart: always
    environment:
      DB_VENDOR: h2
      KEYCLOAK_USER: admin
      KEYCLOAK_PASSWORD: password
      PROXY_ADDRESS_FORWARDING: "true"
    volumes:
      - keycloak:/var/lib/keycloak/data
      - ./keycloak/realm-export.json:/opt/jboss/keycloak/realm-export.json
    expose:
      - 11111
    ports:
      - "11111:11111"
    command:
      - "-b 0.0.0.0"
      - "-Djboss.http.port=11111"
      - "-Dkeycloak.import=/opt/jboss/keycloak/realm-export.json"
    networks:
      - blog-net

volumes:
  postgres:
  keycloak:

networks:
  blog-net:
    driver: bridge
These things has a lot of things we need to unwrap and go through. We obviously have something called Keycloak here. It’s just for demonstrating how we can go about adding more things here. But for this tutorial I will comment out Keycloak since we will not use it here. But if you are in need to setup Keycloak, here is a good example I’ve been using personally.
So lets dig in by looking at the first line in the docker-compose.yml file:
version: '3.7'
This specifies the version we will be using of Docker Compose, syntax could be changed between different versions. Check out documentation of it here: Compose file versions and upgrading
services:
  spring:
    build: .
    container_name: blog-api
    environment:
      POSTGRESQL_HOSTNAME: postgres
      POSTGRESQL_PORT: 5432
      POSTGRESQL_DB_NAME: blogdb_dev
      POSTGRESQL_DB_USER: postgres
      POSTGRESQL_DB_PASSWORD: test1234
      KEYCLOAK_HOSTNAME: keycloak
      KEYCLOAK_PORT: 11111
      # This below is optional if you need to specify a specific Spring Boot profile to use
      # JAVA_OPTS: '-Dspring.profiles.active=dev'
    ports:
      - "8080:8080"
    links:
      - postgres
      - keycloak
    depends_on:
      - postgres
    networks:
      - blog-net
Here we define what kind of services should be orchestrated. We define spring as a service and adding the path to the Dockerfile, which we set as . (current directory where the docker-compose.yml file exists as well). Then we set the name of the container, if we don’t it will set the name as the service name (spring), then we define all the environment variables we need.
We also set what port should be used both internally and externally to expose. We set links to postgres and keycloak service here and we also set a depends_on to the postgres service and that means that first we need to orchestrate up the PostgreSQL database before we start with Spring Boot so it will not fail when starting the application and we define the network it should be connected to. We set all the services to have this network so they can communicate with each other.
postgres:
  image: postgres
  container_name: postgres
  restart: always
  environment:
    POSTGRES_DB: blogdb_dev
    POSTGRES_USER: postgres
    POSTGRES_PASSWORD: test1234
  volumes:
    - postgres:/data/postgres
  ports:
    - "5432:5432"
  networks:
    - blog-net
Here we do the same but defining the PostgreSQL configuration. We specify the image and that will be pulled down (if not already) from the Docker Hub registry. We set the restart to be always, set some environment variables that define what database should be created and what user we will use and set that password.
We also define the volume for the container so we can store the data that is saved into the database, the ports as before with the default port number for PostgreSQL and set it to the same network as the spring service.
keycloak:
  image: jboss/keycloak
  container_name: keycloak
  restart: always
  environment:
    DB_VENDOR: h2
    KEYCLOAK_USER: admin
    KEYCLOAK_PASSWORD: password
    PROXY_ADDRESS_FORWARDING: "true"
  volumes:
    - keycloak:/var/lib/keycloak/data
    - ./keycloak/realm-export.json:/opt/jboss/keycloak/realm-export.json
  expose:
    - 11111
  ports:
    - "11111:11111"
  command:
    - "-b 0.0.0.0"
    - "-Djboss.http.port=11111"
    - "-Dkeycloak.import=/opt/jboss/keycloak/realm-export.json"
  networks:
    - blog-net
Here we define the keycloak service to use. Note that we are adding a volume for a realm-export.json, we are attaching that file so we can import the file into the Keycloak instead of manually having to add the configuration to the Keycloak service. We have a command that we add the file to do the import.
We are then sending the file in to the Keycloak application so that we will use another port than the standard 8080 since Spring Boot runs on port 8080, so we avoid port collisions.
volumes:
  postgres:
  keycloak:

networks:
  blog-net:
    driver: bridge
Here we define the volumes that should exists and the networks with the type of driver that is of type bridge.
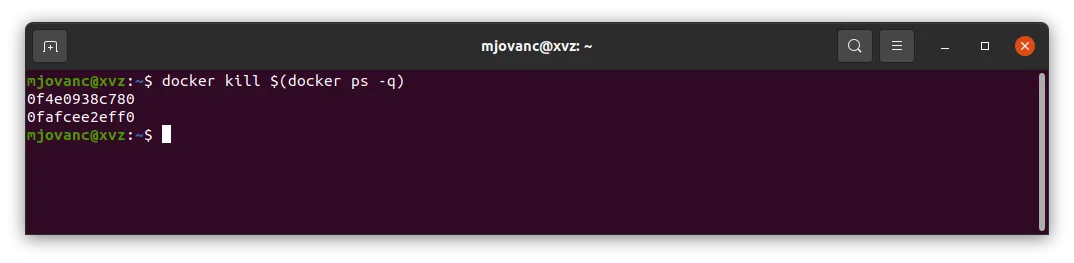
So that’s an example how to setup Spring Boot, PostgreSQL and Keycloak with Docker Compose. But lets leave out Keycloak for now so I will comment out everything regarding Keycloak so we can test running this now. But first lets remove everything that we have been adding to our Docker before by running these commands:
docker kill $(docker ps -q)
docker system prune --all
We now have this updated docker-compose.yml file:
version: '3.7'

services:
  spring:
    build: .
    container_name: blog-api
    environment:
      POSTGRESQL_HOSTNAME: postgres
      POSTGRESQL_PORT: 5432
      POSTGRESQL_DB_NAME: qryptic_dev
      POSTGRESQL_DB_USER: postgres
      POSTGRESQL_DB_PASSWORD: test1234
      # KEYCLOAK_HOSTNAME: keycloak
      # KEYCLOAK_PORT: 11111
      # This below is optional if you need to specify a specific Spring Boot profile to use
      # JAVA_OPTS: '-Dspring.profiles.active=dev'
    ports:
      - "8080:8080"
    links:
      - postgres
      # - keycloak
    depends_on:
      - postgres
    networks:
      - blog-net

  postgres:
    image: postgres
    container_name: postgres
    restart: always
    environment:
      POSTGRES_DB: qryptic_dev
      POSTGRES_USER: postgres
      POSTGRES_PASSWORD: test1234
    volumes:
      - postgres:/data/postgres
    ports:
      - "5432:5432"
    networks:
      - blog-net

#  keycloak:
#    image: jboss/keycloak
#    container_name: keycloak
#    restart: always
#    environment:
#      DB_VENDOR: h2
#      KEYCLOAK_USER: admin
#      KEYCLOAK_PASSWORD: password
#      PROXY_ADDRESS_FORWARDING: "true"
#    volumes:
#      - keycloak:/var/lib/keycloak/data
#      - ./keycloak/realm-export.json:/opt/jboss/keycloak/realm-export.json
#    expose:
#      - 11111
#    ports:
#      - "11111:11111"
#    command:
#      - "-b 0.0.0.0"
#      - "-Djboss.http.port=11111"
#      - "-Dkeycloak.import=/opt/jboss/keycloak/realm-export.json"
#    networks:
#      - blog-net

volumes:
  postgres:
  # keycloak:

networks:
  blog-net:
    driver: bridge
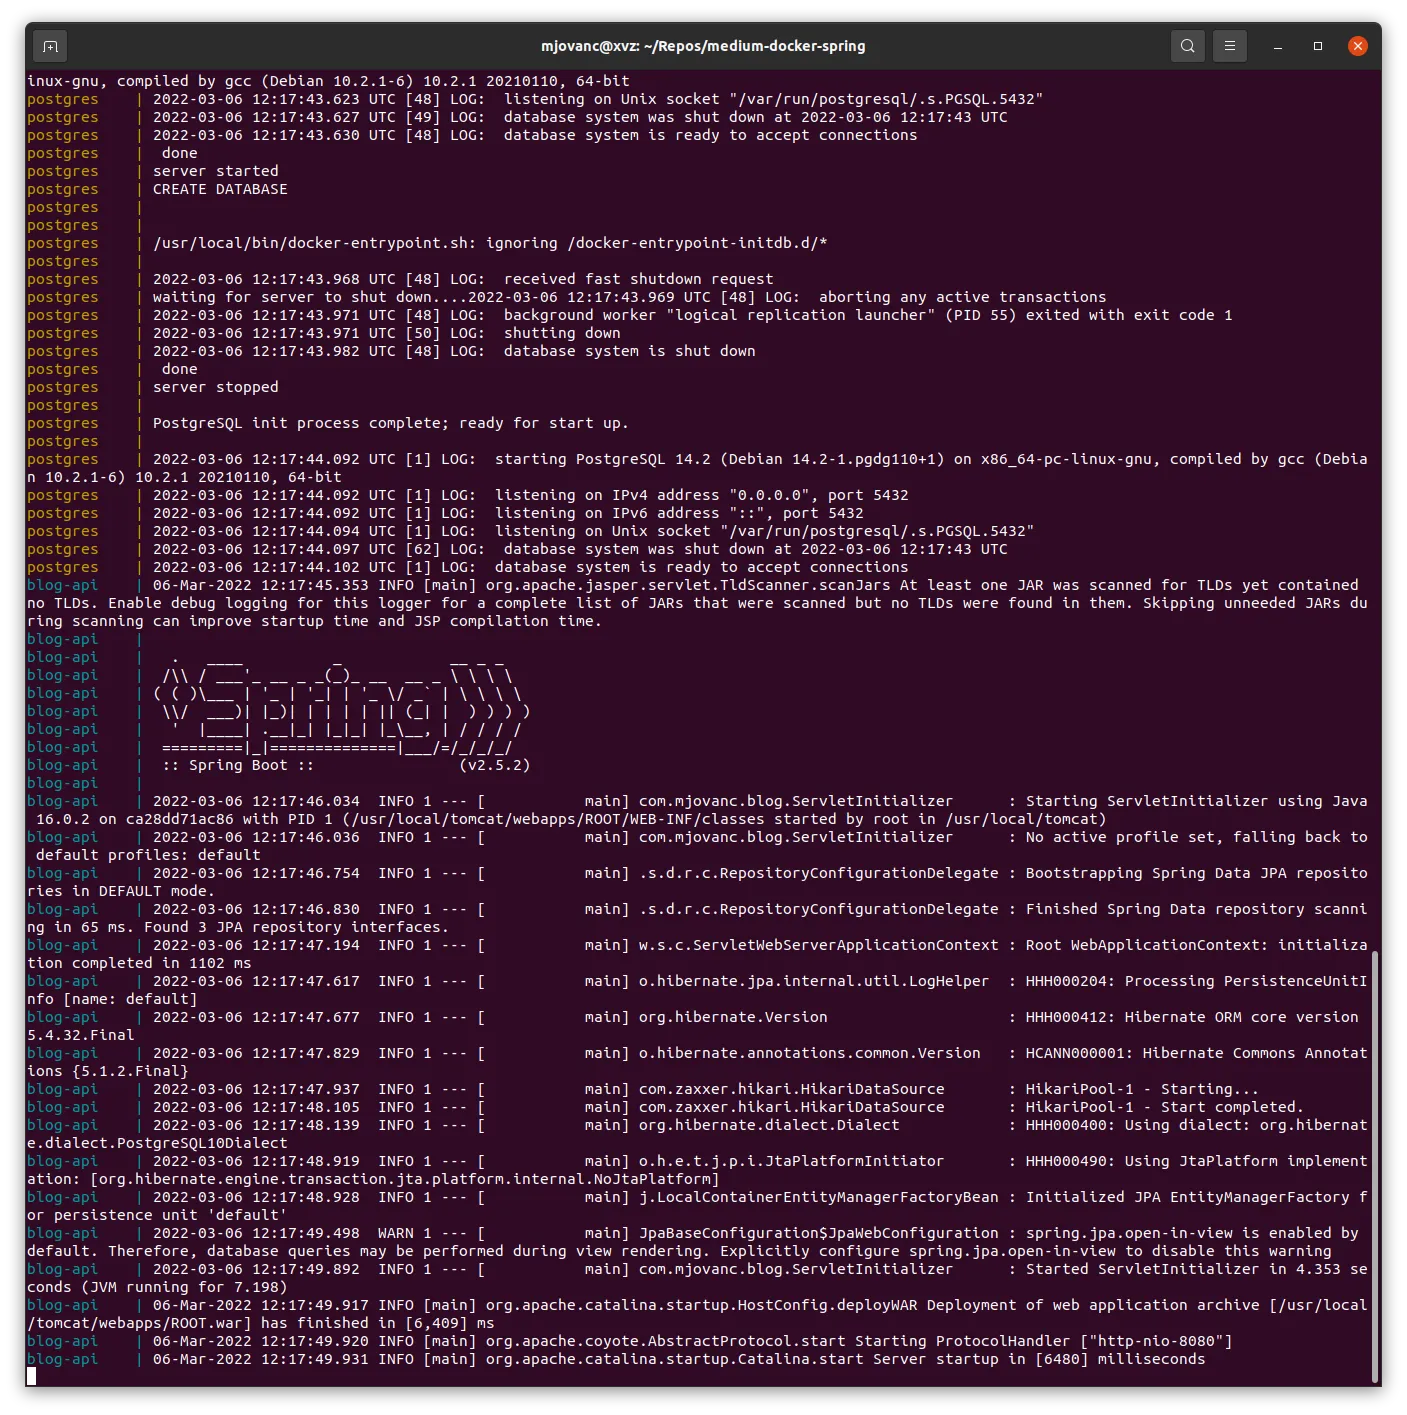
Now lets run Docker Compose:
docker-compose up
We can also set the flag -d so we don’t get all real time console output while running the applications:
docker-compose up -d

To stop the Docker Compose we can press CTRL+C. Then we could also to also remove the network that has been created by:
docker-compose down
If using the -d flag we can stop the orchestration by running the command above as well.
If we would like to rebuild all images if we made some changes we can run this command:
docker-compose up --build
This will force to rebuild all images.
Personally when I’m developing a Spring Boot application it’s very nice to use Docker Compose for setting up everything around Spring Boot such as the PostgreSQL and Keycloak and perhaps even a frontend framework with Angular or React.
But sometimes I want to leave out Spring Boot since it would take a lot of time to rebuild the project to generate a .war file then run docker compose again and so forth.
So if you are like me and want to leave out Spring Boot while developing you could run this command to skip orchestrating up the Spring Boot:
docker-compose up --scale blog-api=0
This is very handy to use. It’s still good to have spring as a service in Docker Compose since I could clone down the repository then run docker-compose up and everything is orchestrated for me so I can minimize time setting up the project locally to test and so forth.
Summary
I feel like knowing Docker it has made me much more productive in my development since I don’t have to waste time setting up systems and development environment manually.
There is a lot of other things we can do with Docker and Docker Compose, but I will leave it at this for now, perhaps in an upcoming tutorial I can go a little bit deeper into some problems that can occur and how we can fix them.
If you found it valuable, please consider sharing it, as it might also be valuable to others. Let me know if you have any questions by reaching me on 𝕏!
Resources
- Docker
- Docker Daemon
- Docker Hub
- Dockerfile
- PostgreSQL
- Docker Container
- IntelliJ
- Gradle
- Keycloak
- Spring Boot